Thursday 8 December 2016

M 42

Messier 42 (The great Orion Nebula).

This image was captured on the night of the 3rd December 2016.

This is my first attempt at M42 and in general I am pleased at the outcome.
My largest area of concern is the bloated and very badly CA affected stars.
Since my processing skills are still in development I have struggled to process out the CA and bloat.
And that explains why the stars look so dismal in this image.
With time and practice I am sure I could improve on this.

The details of the shoot are as follows:

Skywatcher 102.
ISO 800
231 X 25 second exposures stacked in DSS.
Canon 1200D(T5)
For this image I used no Darks, Flats or Bias exposures.

Not using darks,flats and bias is part of an ongoing discussion on AF.net as to whether they make that much difference to short exposure work.
As far as I am concerned the image did not suffer from a lack of the aforementioned files.
The noise was surprisingly low considering the sensor temp according to APT was 32/33 degrees Celsius.

And here she is.


Tuesday 22 November 2016

Durban lightning!

More lightning from the night of the 21st November 2016.

There was only one good image to come from my attempts at capturing lightning.
The others were off center etc.

Again the camera was handheld and supported against the burglar guards on the open window.
Canon 1200D(T5)
8 second exposures at ISO 100.
Using the 18 to 55mm lens at  41mm.


This one almost appears to be striking the trees at the bottom of image. Very cool!

Sunday 13 November 2016

Lightning over Durban.

Since I have been suffering a tragic cloud apocalypse with no decent viewing or imaging opportunities it was time for some good old fashioned "If you can't beat em' join em'".

So with a recent electrical storm that passed over my home to ram home the message of no astronomy I tried my hand at photographing the weather!
More specifically the lightning.

This was my first proper attempt at this and it is remarkably simple.
Aim the camera, focus, and take six second exposures with a ISO of 100.
From 110 images 13 had lighting in them and here are a few of my favourites.


At least that gives you an idea of the rubbish weather here of late.
Hope you enjoyed these images, it was fun taking them and I think I would like to do more.

Sunday 9 October 2016

A RE-PROCESS OF THE TARANTULA.

One aspect of my astrophotography adventures that I am not entirely satisfied with is processing images.

I am using Star Tools for processing my images.I always feel and know I can do better. So I watched a video tutorial by the creator of Star Tools Ivo Jager.

I then tried to apply some of the techniques he explains.
I also have a far better understanding of the modules and some of the tweaks you can make to each.

So I re-processed my Tarantula image I took in Underberg on a recent vacation.

And here is the result, below that is the previous attempt.
In my opinion this is a much improved version.
The dust and gas from the Large Magellanic cloud shows up much better now!


Saturday 1 October 2016

Milky Way from a urban backyard.

I had always figured that capturing any semblance of the Milky way from a light polluted urban backyard was going to be a uphill battle.

After much research trying to figure out ISO settings etc. I took the camera out one clear night and started with a few test shots.
Turns out it was much simpler than I had first thought.
After much trial and error I had a few frames that I stacked in DSS along with some dark frames.
The focus was the hardest part and required many test exposures and adjustments of the focus(manually) until I felt I had it close enough.

The details of the shoot:

14 X 25 second exposures.
13 Dark frames.
The light frames were a mix of ISO 800 and 1600.
Focal length 18.0
Lens was a kit 18-55mm lens.
All of this on a static tripod.
The image was heavily cropped to cut out the neighbours roof and a few other obstructions.

So here is proof that a milky way shot is possible despite intense light pollution.
Why not put your camera on a tripod and give it a whirl?
Here is my peek at the heart of our Galaxy!


And also a annotated version.


Saturday 17 September 2016

Tarantula Nebula (Dorado 30).

While away on my dark sky trip I also managed to capture a few light frames of the Tarantula nebula.

Sadly these were heavily impacted by clouds and a strong lunar presence.
I did not manage nearly as many subs as I would have liked and as a result I have plenty of noise in the image which was a bugger to process out.
I could not get rid of it all and it shows in the image.

The following interesting information is taken from Wikipedia:
The Tarantula Nebula has an apparent magnitude of 8. Considering its distance of about 49 kpc (160,000 light-years), this is an extremely luminous non-stellar object. Its luminosity is so great that if it were as close to Earth as the Orion Nebula, the Tarantula Nebula would cast shadows. In fact it is the most active starburst region known in the Local Group of galaxies. It is also one of the largest such regions in the Local Group with an estimated diameter of 200 pc. The nebula resides on the leading edge of the LMC where ram pressure stripping, and the compression of the interstellar medium likely resulting from this, is at a maximum.

So on to the details of the capture.

21 X 25 second exposures.
22 dark frames.
21 flat frames
20 Bias frames.
ISO 1600
Canon 1200D
Skywatcher 102mm scope.

I took slightly shorter exposures than usual so as to minimize any star trailing or other defects in the exposures.
I also opted for a higher ISO since this was a dark sky site and there is 0% light pollution.
The only real gradient of the night was the white glow cast by the moon, which on this occasion was slightly less than half full!
I really hope I can return there on a weekend with clear skies and no moon to interfere with imaging.

And that brings us to the image.
Enjoy!


Tuesday 13 September 2016

Took a dark sky trip to Underberg in the Drakensberg mountains.
What a spectacular place with stunning mountain views and a river on our doorstep, pure bliss!

Below are two images of the site.
In the first I have climbed up the side of the hill a bit to get the image.
In the image is my wife Trish sitting on the rocks overlooking the river, in the background is the cottage where we were staying.
The second image is the view from directly behind me.


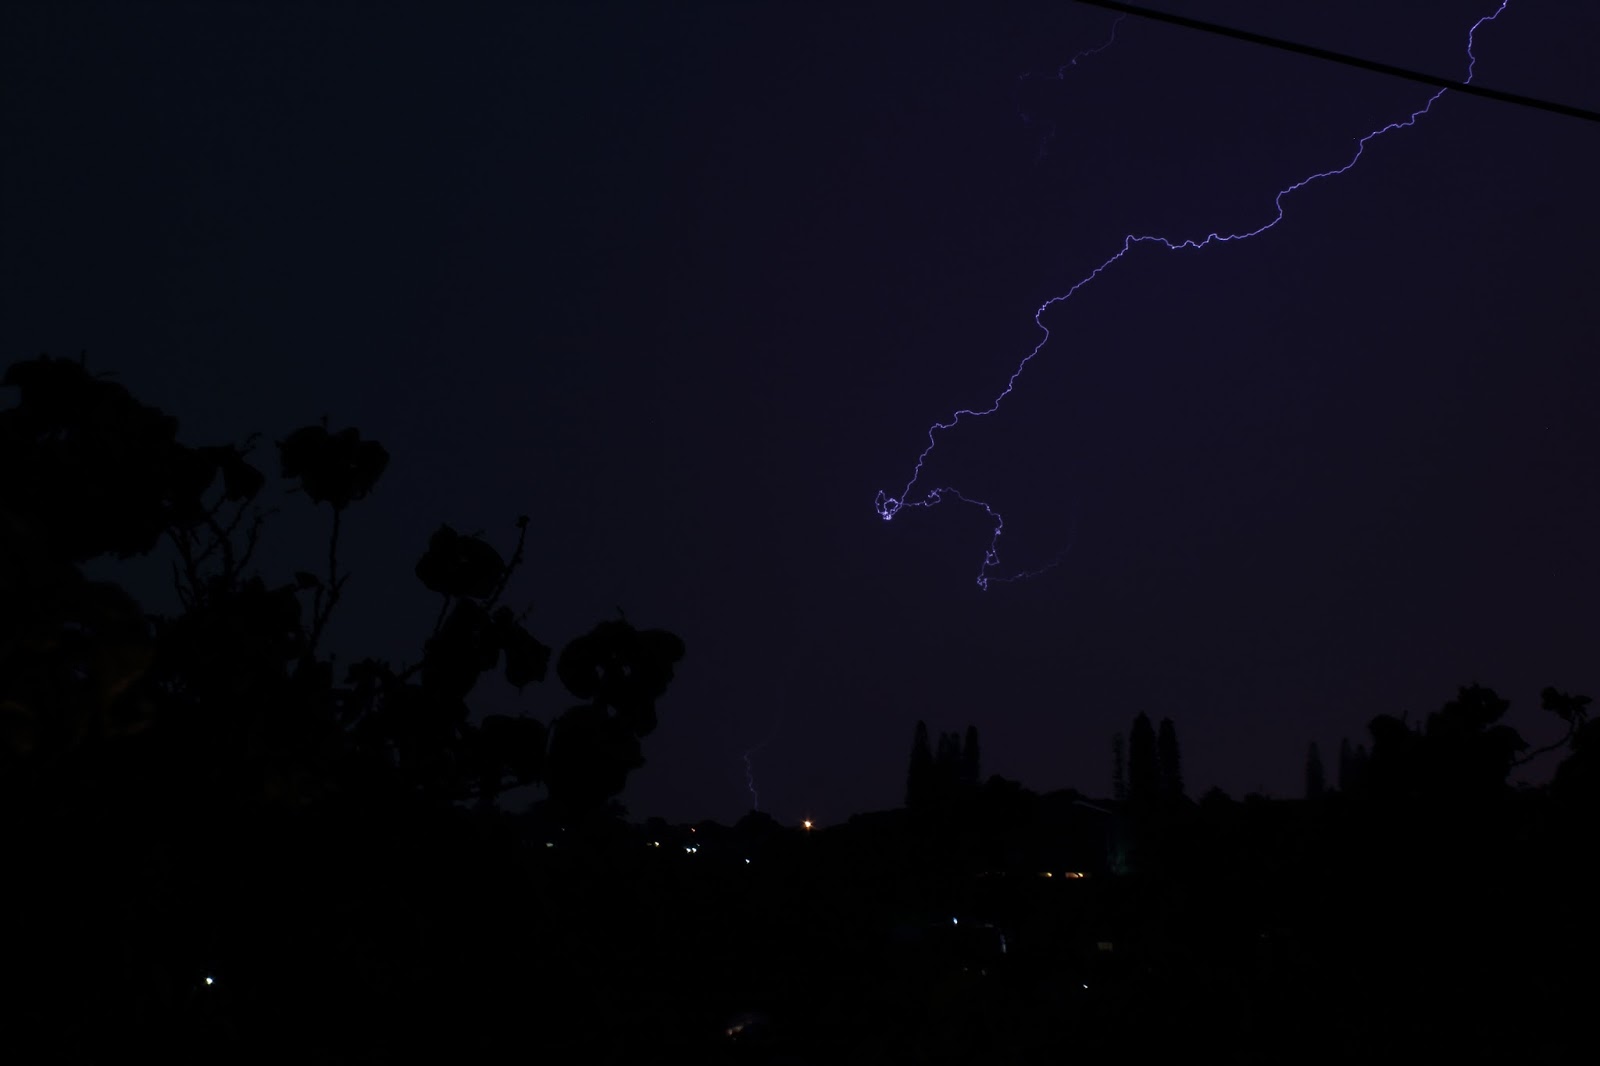
The weather was not committed to the project and had ideas of it's own and that was cloud and rain!
My main target for this trip was M42, I did get a brief glimpse of M42 early Sunday morning at about 4AM.
The clouds had parted just enough for me to view the nebula with the 8" scope, this lasted for about 40 minutes and a thick mist rolled in rendering the stars invisible!
On Sunday night some partially clear skies presented themselves and out came the imaging equipment and Dob.
Visually I managed Saturn that was spectacular with a VERY clear Cassini division and some banding on the planet surface!
I also took in several clusters in Scorpius during a cat and mouse game with the clouds.
I tried for Omega Centauri and had trouble locating it in among all the clouds that were obscuring it and a lot of the stars around it.
Eventually I found it in a gap in the clouds and was disappointed with the view.
While still very large and bright the higher thin cloud was dimming the view considerably.


 So at this point I turned to the Skywatcher 102 and tried for some AP.
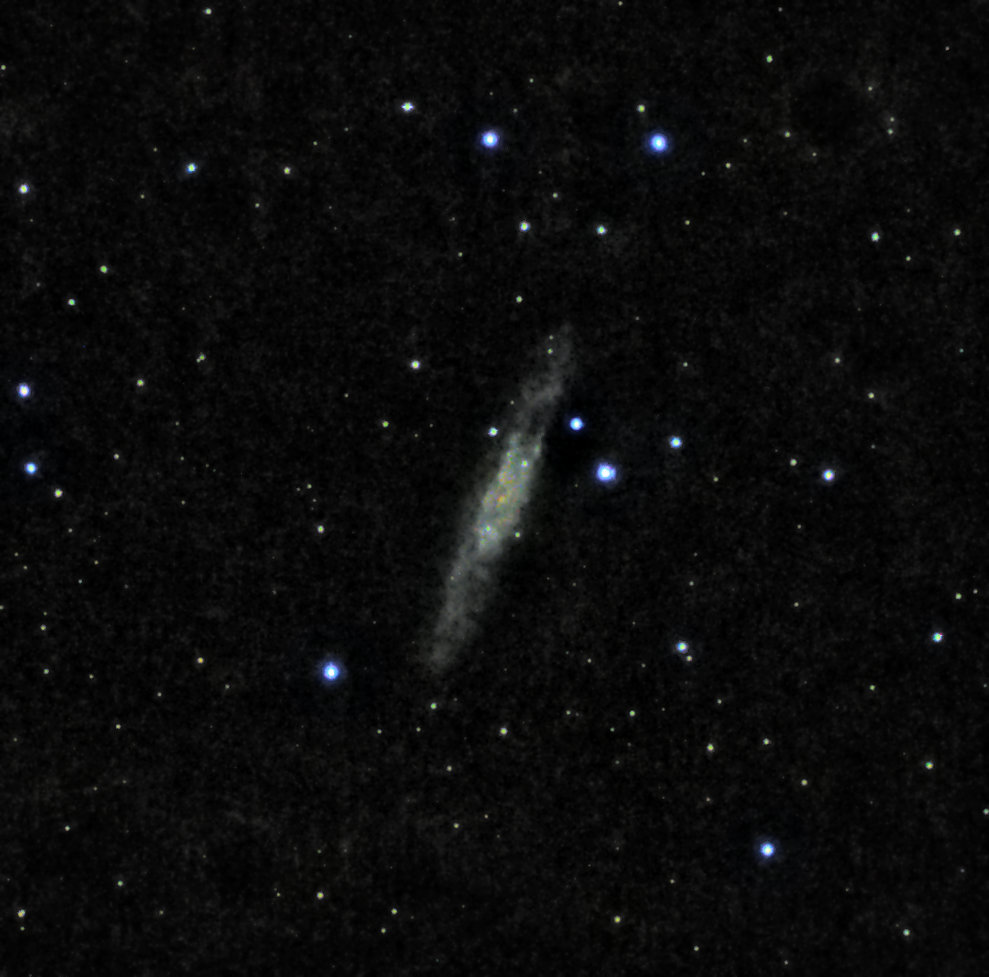
The gaps in between clouds was enough for me to grab some light frames on NGC 104 better known as TUC 47.
I had to throw away many frames as they contained the dreaded clouds!

The details for the shoot as follows:

Light frames 55 X 25 second exposures each.
Dark frames 38 X 25 seconds each.
Flat frames 31.
Bias frames 20.
ISO 1600.
I used a higher ISO as this is a dark sky site.
Skywatcher 102mm scope.
Canon 1200D.

Also captured in the image is the globular cluster NGC 121.


While doing the captures I went back the Dob for some more visual.
Not even twenty minutes later and a heavy dew starts to settle.
Not wanting a soaked Dob or AP kit I took the Dob indoors and put up a large beach umbrella to just cover the Skywatcher and AP equipment enough so as to prevent any dew getting onto it.

Soon enough the clouds closed up the skies and that was the end of a dark sky session.
The moon was a strong contender and shone bright and fierce under 0% light pollution.
That coupled with more cloud than sky put a damper on the evening but there will always be a next time and the views I managed were worth it.


Sunday 28 August 2016

Managed to get some imaging time in last night 27 August 2016.

Target for the night was NGC 253 also known as the Sculptor galaxy.


From Wikipedia:
As one of the brightest galaxies in the sky, the Sculptor Galaxy can be seen through binoculars and is near the star Beta Ceti. It is considered one of the most easily viewed galaxies in the sky after the Andromeda Galaxy.
The Sculptor Galaxy is a good target for observation with a telescope with a 300 mm diameter or larger In such telescopes, it appears as a galaxy with a long, oval bulge and a mottled disc. Although the bulge appears only slightly brighter than the rest of the galaxy, it is fairly extended compared to the disk. In 400 mm scopes and larger, a dark dust lane northwest of the nucleus is visible, and over a dozen faint stars can be seen superimposed on the bulge
I took 400 X 30 second frames on this target.
I then discarded a BUNCH of them and ended up putting 282 into DSS.
DSS then decided to chuck out a few more and it stacked 225.

Short exposure AP.
Light frames 225X30 second exposures.
Dark frames 20
Light frames 10
ISO 800
Skywatcher 102 ALT/AZ mount.
Canon 1200D.(Unmodded)

It is getting considerably warmer here and APT was showing a sensor temp of 33deg to start with and dropping to 30 by the end of the session, this was imaged form 21H30 through midnight.
Fairly high for a DSLR so noise was a major problem in the image, I still have plenty of noise in it as I struggled to reduce it while still keeping a reasonable galaxy.

Here is the result along with a annotated version from Astrometry.net


Wednesday 24 August 2016

August 23rd 2016.

Venus, Jupiter and Mercury.

Took this image of the three planets that are now forming a nice triangle in the night skies just after dusk in the west.
It was also my first view of Mercury.
I have now seen Mercury, Venus, Earth, Mars, Jupiter, Saturn and Neptune either through the scope or naked eye.
One, or two left depending on how you feel about the status of Pluto.

Here are the details of this capture.

ISO 100
Single 5 second exposure
Canon 1200D on a fixed tripod.

The image was captured from a open field overlooking the western horizon.
The houses in the foreground are in Yellowood park with Chatsworth and Queensburgh in the background.


Wednesday 17 August 2016

Friday 12th August 2016.

I was out gathering some photons for my Messier photo project and had completed the intended targets and turned my attentions elsewhere.

Enter the Grus quartet.
This is a collection of four galaxies, NGC 7599, NGC 7590, NGC 7582 and NGC 7552. From bottom to top in the image.
This quartet is located in the constellation Grus.

These are interacting galaxies due to their close proximity to each other.
They lie approximately 55-70 million light years away!

I captured this image with the Skywatcher 102 scope and Canon 1200D.
The details are thus:

40 X 30 second exposures
Also flats, dark and bias frames were used.
ISO 800
Due to the low number of light frames there is substantial noise in the image.

When the weather permits I would like to do a recapture with plenty more light frames.
All stacked in DSS and post processing done with Star tools.


Sunday 10 July 2016

Spent some time Friday 8th July 2016 getting fresh data on the Trifid nebula also known as M20.

I was not entirely happy with my first attempt and wanted something better.

So I took 200 light frames at 30 seconds exposure each(short exposure atrophotography).
From those I dumped a lot that I was not happy with and ended up with 133 to put into DSS for stacking.
Along with fresh dark and flat frames from the same session.

I am still far from happy with the processing, I just know I can do better.
Getting the image is only half the battle, processing it is the other half of the battle!
I will continue to play with it though.
Possibly also add the old data to the new and stack them again.

So here is the result so far in this saga.


I may have gone to far trying to kill the noise.

Also check out the Astrophotography tab and take a look at the new Messiers I have added to the list.
I am doing the M40 photo award at AF.net and have uploaded the images here too.


Monday 6 June 2016

This was imaged on the 3rd June 2016.

It is Messier 17.

From Wikipedia:

The Omega Nebula, also known as the Swan Nebula, Checkmark Nebula, and the Horseshoe Nebula(catalogued as Messier 17 or M17) is an H II region in the constellation Sagittarius. It was discovered by Philippe Loys de Chéseaux in 1745. Charles Messier catalogued it in 1764. It is located in the rich starfields of the Sagittarius area of the Milky Way

M17.
93 light frames at 30 seconds exposure each.
40 Dark frames.
40 Flat frames.
40 Bias frames.
ISO 800
Skywatcher 102 ALT/AZ Synscan goto.
Canon 1200D.

All stacked in DSS and post processed in Star tools.


Taken on the night of 1st June 2016.

The Lagoon nebula or Messier 8.


From Wikipedia:


The Lagoon Nebula (catalogued as Messier 8 or M8, NGC 6523, Sharpless 25, RCW 146, and Gum 72) is a giant interstellar cloud in the constellation Sagittarius. It is classified as an emission nebula and as an H II region.
The Lagoon Nebula was discovered by Giovanni Hodierna before 1654[4] and is one of only two star-forming nebulae faintly visible to the naked eye from mid-northern latitudes. Seen with binoculars, it appears as a distinct oval cloudlike patch with a definite core. In the foreground is the open cluster NGC 6530
36 X Light frames at 30 seconds each.
40 X Dark frames.
40 X Flat frames.
40 X Bias frames.
ISO 800.
Skywatcher 102 ALT/AZ synscan goto.
Canon 1200D.

Stacked in DSS and processed in Star tools and Photoshop CS2.


Imaged on the night of the 1st June 2016.


This is Messier 27 also known as the Dumbbell Nebula.


More from wikipedia:

The Dumbbell Nebula (also known as Apple Core Nebula, Messier 27, M 27, or NGC 6853) is a planetary nebula in the constellation Vulpecula, at a distance of about 1,360 light-years.
This object was the first planetary nebula to be discovered; by Charles Messier in 1764. At its brightness of visual magnitude 7.5 and its diameter of about 8 arcminutes, it is easily visible in binoculars, and a popular observing target in amateur telescopes.


99 X light frames at 30 seconds each.
40 X dark frames.
40 X flat frames.
40 X bias frames.
ISO 800
Stacked in DSS and processing done with Star tools and PSCS2.
Scope is a Skywatcher 102 ALT/AZ synscan goto.
Camera Canon 1200D


Thursday 2 June 2016

The Trifid Nebula.
Messier 20 also known by the designation  NGC 6514

Taken from Wikipedia:

The Trifid Nebula (catalogued as Messier 20 or M20 and as NGC 6514) is an H II region located in Sagittarius. It was discovered by Charles Messier on June 5, 1764. Its name means 'divided into three lobes'. The object is an unusual combination of an open cluster of stars; an emission nebula (the lower, red portion), a reflection nebula (the upper, blue portion) and a dark nebula (the apparent 'gaps' within the emission nebula that cause the trifurcated appearance; these are also designated Barnard 85). Viewed through a small telescope, the Trifid Nebula is a bright and peculiar object, and is thus a perennial favorite of amateur astronomers.
The Trifid Nebula is a star-forming region in the Scutum spiral arm of the Milky Way. The most massive star that has formed in this region is HD 164492A, an O7.5III star with a mass more than 20 times the mass of the Sun. This star is surrounded by a cluster of approximately 3100 young stars.

This was imaged on the night of 1st June 2016.

136 light frames.
40 Dark frames.
40 Flat frames.
40 Bias frames.

All stacked in DSS and post processed in Star tools and Photoshop.
Scope used was my Skywatcher 102
Camera used is my Canon 1200D (unmodded).

It has been a long wait for the Trifid nebula to get up and over the trees here at my house.
And I am very pleased with this image considering it is only short exposure astrophotography!

Hope you enjoy, and comments are always welcomed!


Wednesday 1 June 2016

This image was captured on Monday night the 30th May 2016.

27 X light frames at 30 second exposures.
27 X Dark frames.
27 X Flat frames.
27 X Bias frames.
ISO 800
Scope=Skywatcher 102
Camera= Canon1200D(unmodded).

NGC 6752 is the third brightest GC in the skies after TUC47 and Omega Centauri.


This is another of my short exposure captures.
It is a "double" Globular star cluster consisting of NGC 6528 and NGC 6522.

This was imaged on Monday 30th May 2016.

40 X light frames.
40 X flat frames.
40 X dark frames.
40 X bias frames.
All shot at ISO 800 at 30 second exposures.
Scope is a Skywatcher 102 and camera is a Canon1200D.

This double GC has fascinated me as a visual object.
In my 8" Dob I can just barely see the two with averted vision.
In the Annotated image NGC 5619 is also shown, this is a double star found by William Herschell back in 1860, how he saw that in the busy star field and milky way I don't know!


Monday 30 May 2016

Tried a crop and reprocess of my Southern Pinwheel galaxy image.

Here we go...


Sunday 29 May 2016

May 27th 2016.

NGC 5927.
A Globular star cluster.

This GC is located on the outskirts of the constellation Lupus.

44 light frames at 30 second exposure each.
30 Dark frames.
30 Flat frames.
40 Bias frames.
Scope used: Skywatcher 102.
Camera is a Canon 1200D.

All stacked in DSS and post processed with Star tools.


May 22nd 2016.

Southern Pinwheel Galaxy. NGC 5236 or Messier 83.

This is a barred spiral galaxy that lies some 15 million light years from Earth.
It is found in the constellation Hydra and is one of the closest and brightest barred spiral galaxies in the night skies.

I used  124 light frames at 30 seconds exposure each.
30 dark frames.
30 flat frames.
30 bias frames.

All these were stacked in DSS and post processed in Star tools.

Scope used is my Skywatcher 102 and camera is a Canon 1200D.


I also did a crop of the galaxy.


Monday 2 May 2016

May 1st 2016.

With some really nice skies for a change it was time to revisit a object I first captured back in March for the first time.
The skies were really nice and I also took out the 8" dob for a look at Mars.
Man it looked good in the 8" and 4mm EP.
Distinct surface markings were evident.
After that I surfed through some old favourites, it was great to have the dob out again!

Omega Centaurus.

From Wikipedia:

Omega Centauri (ω Cen), or NGC 5139, is a globular cluster in the constellation of Centaurus that was first identified as a non-stellar object by Edmond Halley in 1677. Located at a distance of 15,800 light-years (4,850 pc), it is the largest globular cluster in the Milky Way at a diameter of roughly 150 light-years. It is estimated to contain approximately 10 million stars and a total mass equivalent to 4 million solar masses.
Omega Centauri is so distinctive from the other galactic globular clusters that it is thought to have an alternate origin as the core remnant of a disrupted dwarf galaxy.

Scope- Skywatcher 102 ALT/AZ goto.
Camera- Canon 1200D.
I took 40 light frames at 30 second exposures and only 8 were usable.
Those 8 along with a few dark and flat frames went into DSS for stacking.

The post processing work was done in Star tools.

Here it is.

Wednesday 27 April 2016

Sunday 24 April 2016.

Captured a few photons of the Centaurus A galaxy.

Took almost 60 light frames and only kept 33 for stacking in DSS.
Dark, flat and bias frames were also added into the mix.
33 X 30 second exposures at ISO 800.

Centaurus A(NGC 5128) lies approximately 10-16 million light years distant.
It also has a super massive black hole at it's center.

The stacked image was processed in Star tools.


Tuesday 19 April 2016

On Friday 15th April I managed to capture new data on the Tarantula Nebula.

I also used Dark frames, Flat and Bias frames with this session.
The results speak for themselves.

The details are the same as earlier except for additional light subs along with the flat and bias frames.

And so here it is.


I also did a reprocess on the Sombrero galaxy.
I re-stacked the light frames and also added flats, bias into the mix.
The star colours are far better and seem more vibrant.

Here is the result.


Saturday 16 April 2016

15th April 2016.

Imaging the Sombrero Galaxy.

This was a "accidental" capture.
It was not my intended target for the night but due to a comedy of errors it ended up as part of the captures from last night.

These are 28X30 second light frames
10 X 30 second dark frames.
ISO 800
Many light frames were discarded when going through the light frames.
Better to be honest with yourself and discard any image that might taint the final product.

Considering the now three quarter moon and some serious LP here I think I have done reasonably well with this one.

The Sombrero Galaxy is a unbarred spiral galaxy in the Virgo constellation and is some 28 million light years away.
It is viewed as side on.

I think some more light frames on this one would be a nice project for another night!
I am thrilled that this is my very first galaxy image.

Scope used was the Skywatcher 102 on a ALT/AZ goto mount.
No filters etc. were used.
All images stacked in DSS and post processed in Star Tools.

Two images here, the wide field and a crop of the galaxy itself.


Tuesday 12 April 2016

An Eency Weency Spider...

April 11 2016.

Took some trial run subs on the Tarantula Nebula.
This is located in the Large Magellanic cloud and is some 160, 000 light years away.

These are 40X30 second light frames and 10X30 second dark frames.
This was also my first use of dark frames in my AP endeavours.

The result here is very encouraging and I hope to find more time over the coming weekend to gather more data.
There are two images here, one is the complete wide field as captured through the scope and the second is a cropped version.

The subs were stacked in DSS and the post processing was done using Star tools.
I left the colour as it came from the camera and did not adjust it in star tools at all.
I preferred the look direct from the camera to what Star tools was doing with the colours.

I also attempted to use my DIY Bahtinov mask for the first time.
This was a learning curve and I was second guessing myself and the spikes did not look "right" and I instead tried using the FHWM function in APT.
That was another steep learning curve and as a result the focus is a little off in the image!

So here are the products of my labours, enjoy!


 Thanks for reading and looking, comments good or bad welcome.

Sunday 3 April 2016

30th March 2016.

I went out with the intention of capturing a open cluster.
I tried working on the jewel box and was not getting satisfactory results. At this point I remembered that a friend and fellow forum member(AF.net) Paul aka PCH suggested I try shoot a cluster.

So slew the scope to Omega Centaurus and take a test shot.
I was amazed at the result.
Went into APT and got the focus as good as I have ever done since starting AP.
With such fine stars in the cluster a sharp focus was called for.

Took 30 X 30 second exposures.
Some were ruined by the tracking movement of the ALT/AZ and were discarded.
A total of 22 light frames went into DSS for stacking.
Again no filters or flat frames were used.

The result is very pleasing and is very promising.
I need to capture even more frames to get slightly more from the core of this image.

All in all I am very pleased at the outcome.
The CA is still evident but does not detract from the overall image, well in my opinion anyway.


Friday 25 March 2016

March 23rd 2016.

Clear skies!
Too bad about the full moon and a strong wind!

That will not be enough to dissuade a new astro photographer like myself and the kit was set up and ready to image with about 20 minutes before the moon started to break out above the tree line.
The session lasted a good two hours.

My previous session was a test run on Eta Carina with 15 second subs.
This time around I started out on the same subject, only this time with 20 second subs and that was increased to 25 second subs as the session wore on.

At the end of the session there were well over 250 subs, sifting through these and discarded poor or below par subs I was left with 210.
Took them all, 20/25 second combined and loaded them up into DSS.

I was surprised at how long DSS took working through the data.
A couple of hours at minimum.

From there they went into Star tools.
This was the largest file I have loaded into star tools, the initial image size was over 6000X3000!
A immediate binning by 50% was needed or else my poor laptop cannot cope and hangs!

Details for this shoot are as follows:

ISO 800
100(or so) subs at 20 seconds.
100+ at 25 seconds
Combined and stacked in DSS
Post processing done in Star tools and Photoshop.

And here it is, a large improvement on my first attempt.


Monday 21 March 2016

The time has arrived my friends!

I finally have a image taken with a camera through a telescope!
Whoo Hoooo!!

I was fortunate enough to grab a few photons one night during the week (March 14-18).
The plan did not go as anticipated and I only took the lights!
In my excitement at actually capturing photons I completely forgot to do darks etc.

Well no problem, this is Africa and we are built tough!
So putting the light subs through DSS proved to be a exercise in frustration!
Turns out my copy of DSS was corrupted and deleting it and downloading the latest model made a world of difference.

Now it would stack 90% of the subs and I had a image to put into Star Tools.
A bit of a crop here and there and some spit and polish and out popped a image that almost resembles Eta Carina.
It is not the finest image and I am aware of the glaring problems, like a decent focus, but it is mine and I have to claim this child!

Details as follows:

Canon 1200D, no modifications or any filters used.
ISO 800
36 subs at 15 second exposure time.
Stacked in DSS and post processed in Star tools and Photoshop CS2.

And I now present my very first AP image through a scope using a Canon DSLR.


At the suggestion of a friend(thanks Jen) I have also downloaded Astro photography tool, a very handy bit of software aimed at the amateur astro photographer with all the functions you will need when out by the scope.
There is a learning curve to this AP bussiness that is steep, however it is scalable and I can only improve from here on out!

Comments as always are welcomed, good or bad!


Thursday 17 March 2016

March 17 2016.

Some partially clear skies presented tonight, not enough for any serious scope viewing but enough to try some hand held shots of the moon with my Canon 1200D.

I was using the 75-300mm F4-5.6 lens at a focal length of 300mm.
ISO 400
Shutter speed of 1/125 with a aperture value of 22.

Did a little processing with Star tools and Photoshop, mostly a crop and some sharpening.
Then Photoshop for some saturation adjustments and  convert and save as a JPEG image.

And here is the result.


Sunday 13 March 2016

March 13 2016.

Tried my hand at some DSLR solar imaging today.
The images were acquired with my Canon 1200D and taken through the skywatcher 102.

Man what a learning curve that involved!
Getting the white balance right, then exposure times, then, then,then...

After almost a hour I finally had a image on screen that looked like a disc!
Trying to find the sweet spot for the focus is another headache.
These are still out of focus.

So here are the results of more than a hours labour this morning.

Full disc.


And the sunspots closer up.


This solar imaging is a lot harder than one would think and I am going to need a lot more practice at this.
It's a good start so far and I am reasonably happy with the outcome.

Sunday 6 March 2016

More hot humid and sunny days followed by cloudy damn nights have led me back to sketching from photographs!

This is my attempt at ARP 142.

This interacting galaxy duo is collectively called Arp 142. The pair contains the disturbed, star-forming spiral galaxy NGC 2936, along with its elliptical companion, NGC 2937.

This was drawn with black and white pastel pencils on black sketch paper.
About a hour and a half duration on the sketch!

Hope you enjoy, comments etc. welcomed!

Wednesday 2 March 2016

Had some clear sky last night after sooooo long!
Decided to use the time and try out some more photographs of the night sky with the new canon 1200D on it's tripod.

Out of a good 50+ images I selected these two for posting.
A lot of the others were trying out the different ISO settings etc. to see how the camera behaves.
I am still learning the ropes here in anticipation of some short exposure AP down the road.
These two images are not very well framed as I cannot see the target through the viewfinder, it was a bit of trial and error getting them in the frame at all!!
I did not use the laptop so that made it even more challenging, a good learning exercise!

Here are two images, the first is Eta Carina and surrounds.
The second is the Crux and surrounds.
These are both single shot images, no stacking etc.
They were both processed, very minimally I might add in Star tools, mostly contrast and colour module/s.

To the right of Eta Carina you can spot the Southern Pleiades, to the top of the image is NGC 3114 (OC) and just below Eta Carina is the OC known as The wishing well cluster, NGC 3532.

The settings are as follows:
ISO 1600
10 sec exposure
Focal length 100.0 mm
F4.5

Two new beginner images!-resized-carina.jpg

The Crux or Southern Cross.

ISO 800
30 sec exposure
F5.6
Focal length 51.0 mm

You might have a hard time spotting the Crux in among all the stars that show up in the image.
When viewing this naked eye I can only see the four main stars that make up this constellation with my LP constraints.
The camera however sees a whole different kettle of fish!

Two new beginner images!-resized-crux.jpeg

Wednesday 24 February 2016

Had another semi clear evening and wanted to try out the new camera again.
Taking images of the night sky by mounting the camera on the tripod.
I had a go at getting Orion into view and tried a few shots.

The wind was belting and it kept moving the camera tripod combination with the stronger gusts which ruined many of the subs.
One did finally come out fairly steady though.

Details: 8 sec exposure, ISO 800 at F5.0 and a focal lenght of 45.00mm.
I did the focusing manually and this is a lot tougher than one would expect when trying to peer through the eyepiece and focus on the stars!

So here is the processed version(Star tools).


The other thing that is quite astonishing is just how many stars are picked up by the camera!
With the naked eye only the brightest stars in the Orion constellation are visible, by my count about 12 or so.
And in the image there are hundreds!
Cannot wait to get the T Ring for the camera and get it attached to the scope!

Monday 22 February 2016

Had almost 40mins of clear sky and decided to put the camera to the test again.

This time my focus was far better, I used Canopus to focus on before taking any images.
This shot was taken at ISO1600, 15 second exposure,focal lenght 51.0mm, aperture setting F5.6
Pointed in the general direction of Carina.
Processing was done with Star Tools.